6 Ways To Flash Asus Z007 and Zenfone C 100% Success – Your Favorite Asus Handphone is Having a Problem? need an article on how to flash Asus? If so, you are in the right place, I will discuss in this post, how to flash the Asus Z007.

How to Flash Asus Z007 and Zenfone C 100% Success 2024
As we already know, basically there are 2 possibilities for damage to the Smartphone, namely damage to hardware and software.
Read more:
- How to Make Square Root Symbol In MS Word
- How To Root Android Using Kingroot (100% Working)
- How To Root Redmi 4A Without PC (100% Working)
- How to Flash Asus Zenfone 5 (T00F / T00J)
- How To Flash Samsung J1 Ace SM-110G
Hardware damage itself is quite difficult to overcome alone, my friend needs to bring it to the place of service to be supported by qualified repair equipment.
While the damage to the software generally occurs symptoms such as cellphone slow, app force closed, and app system error, until the most severe can bootloop.
Well, the only way to overcome bootloop or totally dead cellphones, especially on this Asus Z007 phone is by flashing.
Flash Asus Z007 and Zenfone C 100% Success
Flashing on the Asus Z007 cellphone alone is 3 ways you can do it. These three ways you can choose one of the easiest.
#1. Flash the Asus Zenfone C via the Flash Tool
To be able to flash the Asus Zenfone C via flashtool, Please Buddy prepare and download the required tool file first:
- Computers / PCs / Laptops that use Windows OS.
- Data cable (try to use an ORI data cable).
- Download the Asus Zenfone C Z007 Firmware file, then extracts it.
- Download the Asus Android USB Driver driver.
- Download Asus Flashtool Zenfone software c.
If the above requirements have been fulfilled, then please Buddy follow the method below from step to step.

- Ensure the Smartphone battery capacity is more than 50% charged for flashing.
- Enter Droidboot Mode. By pressing the power button + volume UP together.
- Then please open the Asus Flash Tool software, then run it as administrator.
- Then please connect the Asus Zenfone C Z007 to your computer using a USB cable. If a USB icon appears, the device has been detected by the computer.
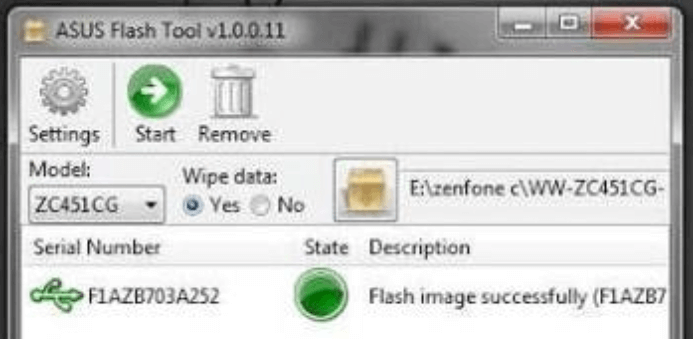
- Next, please select the type ZC451CG in the Data Wipe followed by selecting the Yes option. Then, click browse to enter the firmware that you downloaded earlier.
- The next step is to click on the USB icon and click the start button to start the Asus Zenfone C. flashing process. Wait until the flashing process is complete.
- If the state has changed to green and the notification ” Flash image successfully ” appears, then the flashing process of your handphone is complete.

After that, please close the Asus Flash Tools application and disconnect the USB cable from the computer. Then select the reboot menu in Droidboot to restart your cellphone.
Wait for the boot process to run (usually, the first boot will take a little longer), the android standard startup will also appear to set the Language, Google Account, network, etc.
#2. How to Flash Asus Z007 via SD Card
The next way to flash you can use the SC Card or Hp memory card. The advantage of using an SD Card or MMC flash is that you can do it without a PC. So it’s certainly more practical, easy, and fast.

For flashing Asus C using SD Card, the steps are as follows:
- First, prepare the SD Card that has been formatted to Fat 32 Default.
- Download the latest Asus Zenfone C Firmware file.
- If so, copy the firmware file to the SD Card in the .zip format.
- Attach the SD Card to your Asus Zenfone C handphone.
- Then continue to enter Asus Recovery Mode by pressing the Volume Down + Power buttons together.
- Then select the bottom option menu ” apply update from sd card“
- Now, buddy, look for the firmware file that was copied to the SC card.
- The flash process will take place and usually takes about 5-8 minutes.
- After the flash is finished, the cellphone screen will return to the Recovery menu, please tap ” reboot system “
- Then your cellphone will restart automatically and load to the home screen (where you have to be patient because loading is usually quite long)
- Done, the Asus Zenfone C is already like the factory default.
#3. Flash Asus Zenfone C Via QFIL
Actually, there are many types of mobile phones that can be flashed using QFIL software. Admin himself has also summarized articles on How to Flash Using QFIL which can help with flashing problems, especially the Asus Zenfone C Z007 itself.
Prevent Bootloop on Asus Mobile Phones
Well, just for lunch when your Asus Mobile is back to normal, or for those of you who don’t want to have HP Bootloop problems, you can try some of the following tips:
#1. Patience Waiting for Battery Charging
First, try to buddy to wait until the battery is 100% charged first. So if it’s not full, don’t make it a habit to unplug the battery.
#2. Avoid Originally Removing the Battery
Removing the battery in a cell phone state is the same as forcing the operating system on the cell phone to be disconnected unexpectedly. This kind of thing later if often done can cause damage to the operating system, even HP components.
#3. Selective in Downloading and Installing Applications
You also need to be selective and not careless in downloading and installing an application. So if you want to download an application, examine in advance whether the application is safe for your phone or not.
Read more:
- 11 Ways To Take Screenshots on Asus Laptop Windows 10
- Bypass Samsung Google Account Verification (FRP Lock)
- How to Root Lenovo A7700 and Install TWRP Recovery
Conclusion:
It is important to note that flashing your device can potentially void your warranty and may cause irreparable damage to your device if not done correctly.
Therefore, it is recommended that you proceed with caution and seek professional help if you are unsure about the flashing process.
Don’t forget to bookmark and always visit Technadvice.com every day because here you can find the latest technology information such as How-to Guide Tips and Tricks Blogging Digital Marketing Windows Android Root Social Media games, ETC. Best of luck.
The post 6 Ways To Flash Asus Z007 and Zenfone C 100% Success 2024 appeared first on Technadvice.
Comments
Post a Comment