10 Ways To Install Windows 10 on MacBook and iMac – Windows 10 and macOS can be installed on the MacBook and iMac with a dual boot method so that we can use them interchangeably.
How To Install Windows 10 on MacBook and iMac 2023
Both of these operating systems have their own advantages and disadvantages. macOS wins in terms of stability, graphical display, and color accuracy, while Windows excels in terms of compatibility and availability of a full suite of applications.
Read more:
- How To Take Screenshot on Mac Computer
- Best Tips for Taking Care of Your MacBook Battery
- How To Hide IP Addresses on Windows and Mac
- Review Recoverit – Software For Restore lost data on Mac
Finding free apps for Windows is easy, unlike macOS, whose apps are mostly paid. For gaming activities, Windows is also superior. But when it comes to photography and video editing, macOS with its high color accuracy is of course the winner.
In order to get the maximum benefit from the Apple and Microsoft operating systems, we just use them alternately.
Install Windows 10 on MacBook and iMac
#1. Preparation
Before starting the installation process, there are a number of things that you need to prepare, namely:
Internet connection
First, make sure you are using a fast and stable internet connection, because later we will download ISO files, and drivers, and perform Windows updates. This will eat up a lot of internet quota.
Enough free space
Second, your MacBook and iMac should have more than 100GB of free space.
Some of this free space will later be used for the Windows 10 partition, and the rest for storage space on macOS.
If it’s less than that, I suggest doing the cleaning first or backing up rarely used data to other storage media such as flash drives or external hard disks.
Power source
When installing Windows 10, your MacBook Pro should be connected to a charger, because it is feared that the battery is not enough and will interfere with the installation process.
After making sure all the above preparations have been fulfilled, continue to the next step.
#2. Download the Windows 10 ISO
You can get a Windows 10 ISO file directly from the official Microsoft website. It is highly recommended to use the ISO obtained directly from the official site to make sure you download the original version, not from other sites.
Here’s how to download a Windows 10 ISO file from the Microsoft site, skip this step if you already have the file.
First, open the following link using the Google Chrome browser:
https://www.microsoft.com/en-us/software-download/windows10
After entering the web page, you still cannot find the ISO download link due to Microsoft’s new policy which requires installation via the Media creation tool.
To bring up the ISO download link, all you need to do is:
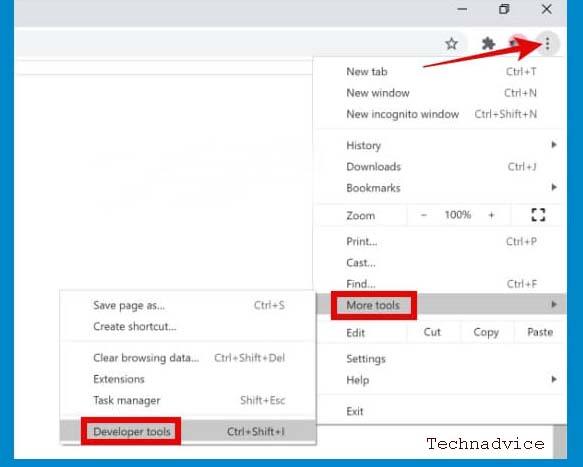
Click on the Settings button on Google Chrome> More tools > select Developer Tools.
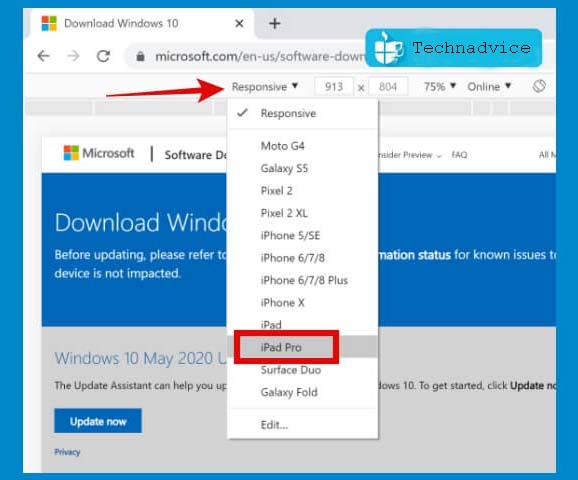
On the device, change to iPad Pro > then reload the web page by pressing the F5 key.
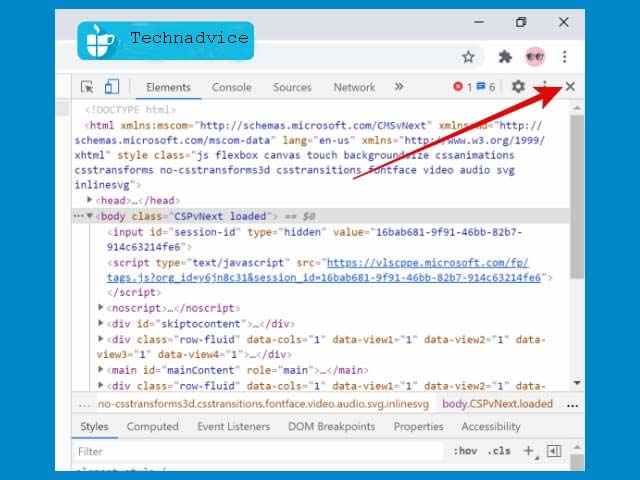
The web page will change, and there you can find a button to download the Windows 10 ISO. Close the Developer Tools view by pressing the cross button in the right corner to make the site look bigger.
Then click on the Select edition button > choose Windows 10 > then click the Confirm button.
In the Select, the product language section, select the language you want to use in Windows. Can Hindi or English International > then click the Confirm button.
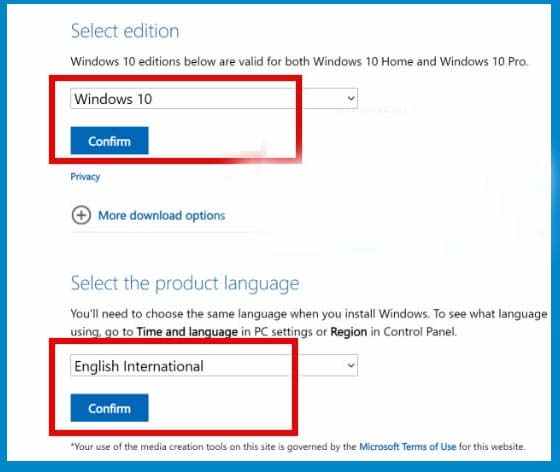
Next, select the Windows architecture version to download> click on 64-bit Download.
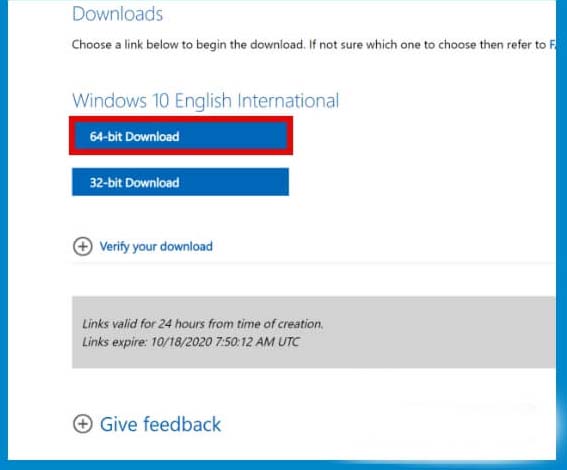
The ISO download process will start, wait for it to finish.
Regarding which version of the architecture to use whether 32bit or 64bit, you can actually adjust it yourself as needed.
It is highly recommended to use the 64-bit version because currently, the 64-bit version is the most compatible, considering that almost all the latest applications are now focused on being developed for 64-bit architectures.
But if you have special needs that require a 32-bit operating system then please choose the 32-bit version.
After the ISO file has finished downloading, proceed to the next step.
#3. Start the installation process
Make sure your MacBook or iMac is connected to a stable internet connection and connected to the charger.
After that open the Boot Camp Assistant application on the Mac. You do this by going to Launchpad using a three-finger gesture> select Others > select Boot Camp Assistant.
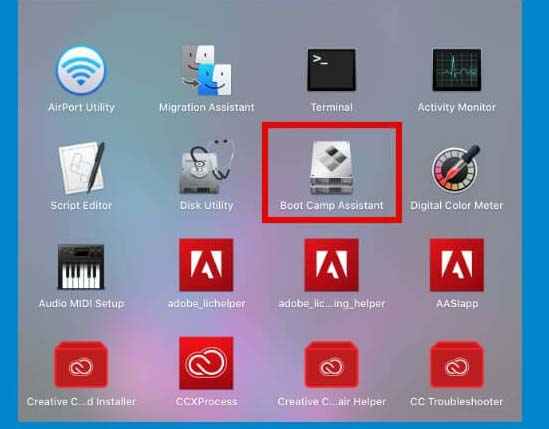
After the Boot Camp Assistant application opens click on the Continue button.
Next, decide how many partitions you want to allocate for the Windows 10 operating system. Drag the scaling points left and right to resize.
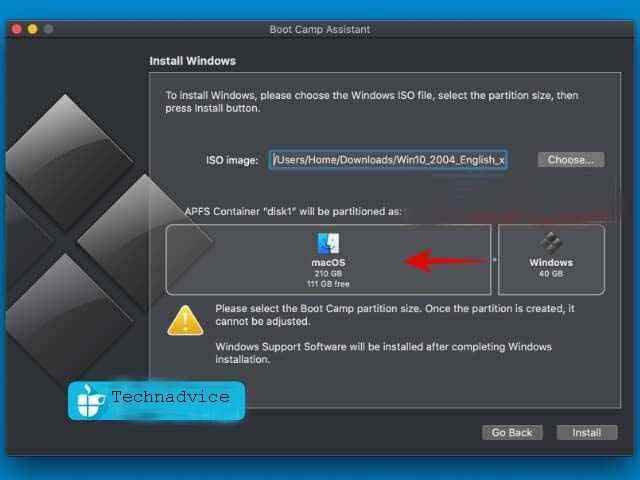
What is the ideal size for Windows 10?
If you are still not sure what size is the right size then let me give you a little idea.
Windows 10 is an operating system that is quite large once installed.
In a fresh install condition without an application, the size can reach 15GB, not to mention later after updating, installing drivers, and the necessary applications.
Based on my experience when using Windows 10 on a PC, the 100GB storage allocation is enough to run Windows 10 quietly.
With that much storage space, I can install all the applications needed for work, multimedia, and light games, and there is still free space left to store files.
If you still have enough storage space on your MacBook and iMac to allocate the 100GB partition for Windows 10, then this is the best choice. However, if it is not possible then 60-80GB is sufficient.
This partition size determination can only be done at the beginning of the installation process. After Windows 10 is installed, the partition cannot be added. So consider carefully according to your needs.
After determining the size of the partition, then click on the Install button.
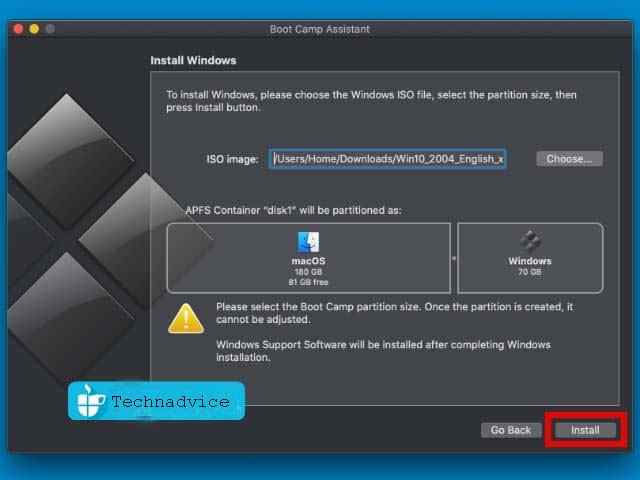
The installation will start, you only need to wait until the Windows support software download process is complete.
When finished you will be asked to enter the mac password, type your password then click the OK button.
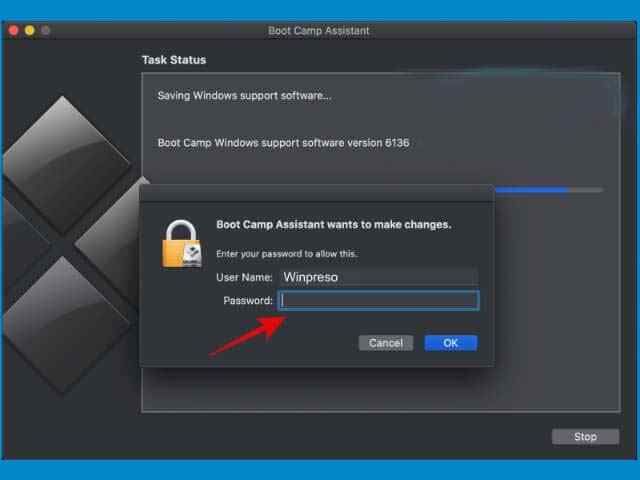
The Mac will restart and automatically enter the Windows Installation Wizard page.
The next install process is the same as installing Windows 10 on another PC or laptop. In order for you to feel at ease, I will explain the process step by step.
In the first window select Language (Hindi / English), Time and currency format (English United States), and Keyboard input method (US) > then click the Next button.
In the Activate Windows window, click on I don’t have a product key. If you already have a valid license, you can enter it directly in the column provided. After that click the Next button.
Then choose the version of Windows you want, which can be the Home or Pro version (recommended)> click the Next button.
Check I accept the license term > then click the Next button.
Then select the partition labeled BOOTCAMP. Don’t get this wrong. After that click the Next button.
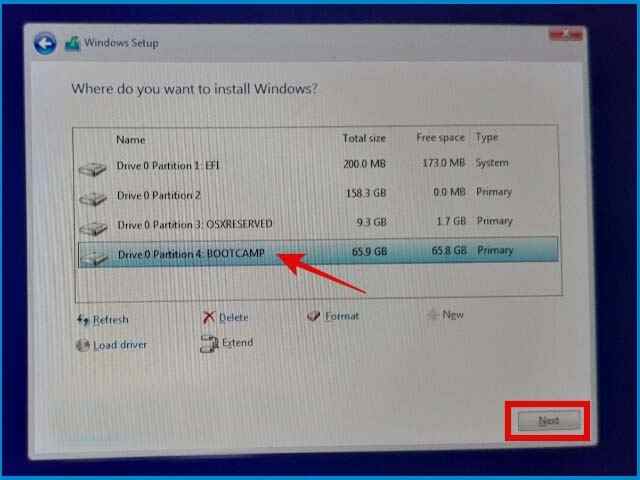
The Windows 10 install process will start, wait for it to finish.
Sip your coffee first to relax, don’t forget the, don’t worry, if the steps are done correctly, God willing, it will work.
After the installation process is complete, the Mac will automatically restart and enter the finishing stage.
Then you just have to continue the Windows installation process by filling in the account name, password, region, keyboard layout, and basic preferences. Just follow the process, and skip the unnecessary ones. These settings can still be changed later.
When finished you will enter the Windows desktop.
#4. Install the driver
Shortly after entering the desktop, the Boot Camp application window will appear.
Click the Next button > click Install.
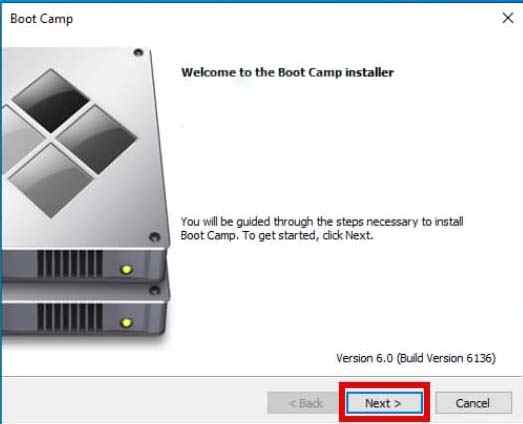
At this stage, we will install the required drivers via the Boot Camp Installer.
The installation process takes place automatically, Boot Camp will install all the drivers needed so we no longer need to look for them one by one.
Wait until the install process is complete then click the Finish button > Restart.
#5. Update Windows
After entering the desktop you will see a better Windows appearance because the graphics driver has been successfully installed. WiFi signal can also be detected.
The next step is to update Windows.
Connect your Mac to the internet, either via WiFi or LAN.
After that, click the Start button > Settings > Update & Security > Windows Update > click the Check for updates button.
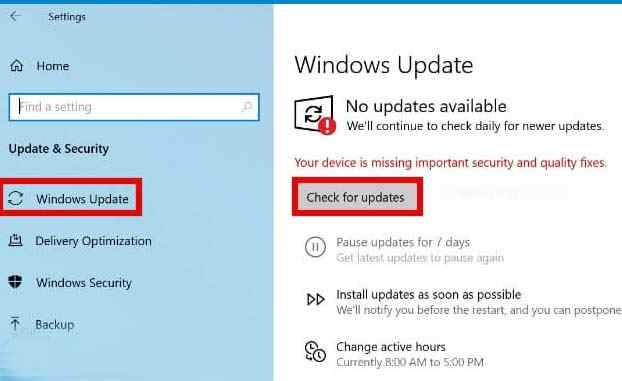
Wait for the update process to complete. This will take a while.
After the update has been downloaded and installed, restart your computer.
#6. Font size adjustment
After the driver has been installed and Windows has been updated, you can actually use it at this point. But the font size might look too small, especially if you’re using a 15-inch screen or on an iMac.
To overcome this, we can adjust the display scale through the settings provided by Windows 10.
Click the Start button > Settings > System > Display.
In the Scale and Layout section > click Advanced scaling settings.
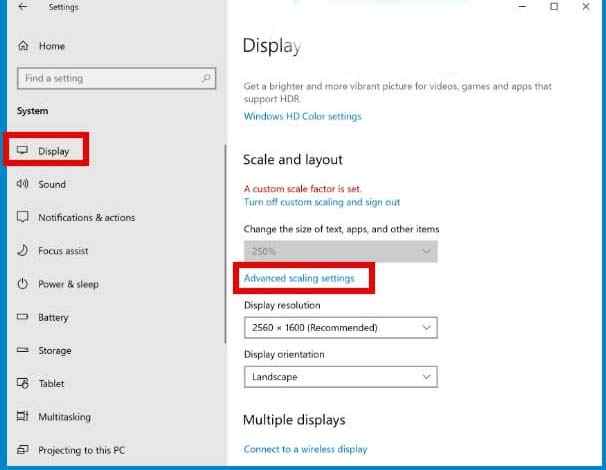
In the Custom Scaling > change the value to 200.
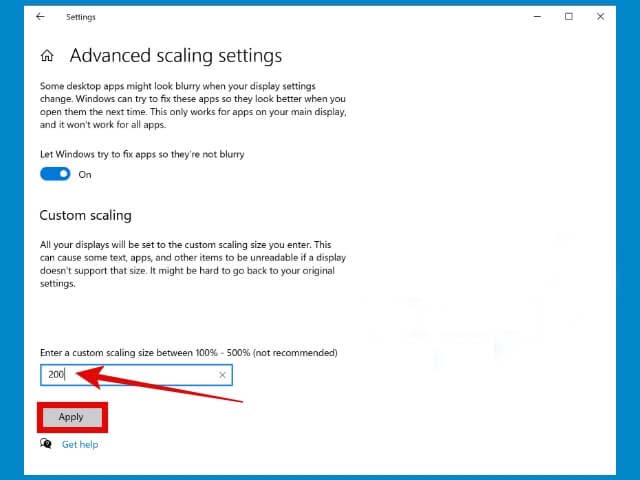
To see the changes, sign out first from Windows by clicking the Start button > clicking Account> clicking Sign out.
You can vary the scaling values until you find the font size and other components that you think are the most ideal. The recommended value is 100-500.
#7. Trackpad settings
The important part that must be set next is the trackpad. When using macOS you might experience a very smooth trackpad, the right sensitivity, crunchy movements, and accurate clicks.
But when using Windows on a Mac, it’s a different story, if it’s not set, the difference will be very pronounced.
Even though we can’t make a trackpad while using Windows as slick as macOS, at least we can still adjust it so it’s comfortable to use.
First, click on the System Tray icon > right-click on the Boot Camp icon > select Boot Camp Control Panel.
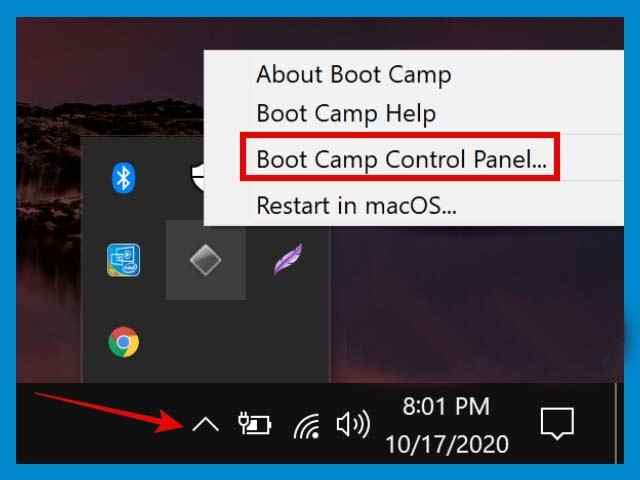
After the Boot Camp Control Panel window opens> click on the Trackpad tab.
Check on Tap to Click, Dragging, Secondary Tap > click OK.
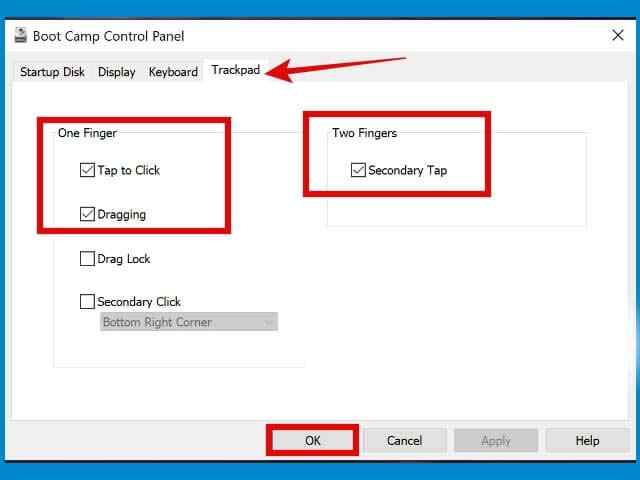
Close the Boot Camp Control Panel window.
Next, click on the Start button > Settings > Devices > Mouse.
Set the cursor speed and scrolling as desired.
Then click on the Touchpad tab > adjust the sensitivity.
#8. Remapping the keyboard
The next adjustment that needs to be done is the keyboard.
When using Windows, the Command key will function as the Windows key, while on macOS it functions like the CTRL key on Windows.
This can be a bit confusing, especially when doing shortcuts to frequently used tasks such as copy-paste (Command + C / V) and Select All (Command + A).
Therefore we need to do a remapping to swap the functions of the Command and control keys.
#9. Install the required applications
After all the steps above have been carried out, the final step is to install the necessary applications.
You can start with basic applications such as Office, Multimedia player, Photo editor, and other basic applications.
#10. Windows 10 is ready to use
Done, until here we have successfully installed dual boot Windows 10 with macOS.
This installation method using Boot Camp can be done on the following Apple devices:
- MacBook Pro (Early 2012 and later)
- MacBook Air (Early 2012 and later)
- MacBook (Early 2015 and later)
- iMac Pro (2017)
- iMac (Early 2012 and later) *
- Mac Mini (Early 2012 and later)
- Mac mini Server (Late 2012)
- Mac Pro (Late 2013)
Read more:
- macOS Understanding and History, Advantages, and Disadvantages
- How to Fix Blur and Small Text in Windows 10
- 36 Best Free Windows 10 Anime Theme
Conclusion:
So, friends, that’s above on how to install Windows 10 on MacBook and iMac, If you find difficulties, don’t hesitate to comment.
Don’t forget to bookmark and always visit Technadvice.com every day because here you can find the latest technology information such as How-to Guide Tips and Tricks Blogging Digital Marketing Windows Android Root Social Media games, ETC. Best of luck.
The post 10 Ways To Install Windows 10 on MacBook and iMac 2023 appeared first on Technadvice.
Comments
Post a Comment